


So! You want to build your own UV display box?
Here is what I have found after years of building them. (For boxes larger than our Glow Box (24cm x 24cm x 24cm, those years for me are passed.)
Before you start…
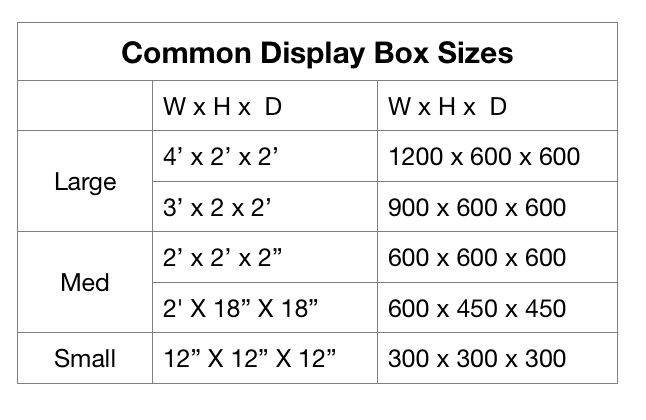
- What size? “Landscape” rather than “portrait” works best – explained later. Some common sizes are shown in the table, but the size needs to work for the UV lighting you want to use.
- What UV wavelengths do you want? If LW only, you can have any size you want, but if you want SW, you must first work out what size lamp you want (or can afford!), and build your box to accommodate that lamp. If you build the box first and then try to buy a UV display lamp you might find there isn’t a lamp size that will fit.
- What will you use to make it? I use 9mm marine grade plywood. You could use MDF or sheet metal, but not glass (see below).
What won’t work?
- Glass shouldn’t be used. It may fluoresce, and looking at glowing rocks through fluorescing glass is like looking through a dense fog. Some glass fluoresces with one side facing the UV light, but not the other side. Glass blocks most SW and MW, but allows LW to pass through.
- Shelves. They cast shadows which stop UV getting to lower rocks. Best to use steps. They enable all the rocks to be seen, and allow UV to get to all of them. (See later)
- UV strip LEDs. They are too weak, and are not filtered. They are useless for mineral fluorescence. You need modern high power LEDs usually mounted on a “star board”. (See later)
- A tall box. A bit of tech stuff: The inverse square law says the amount of UV reaching a rock is inversely proportional to the square of its distance from the lamp. That means if you double its distance from the lamp, the amount of light reaching the rock goes down by 4 times. So the shape of the box is important. Using computer language, you want a landscape shaped box, not a portrait shaped box. A tall box means not enough UV reaches the the lowest placed minerals – unless they are very bright fluorescers, which most minerals aren’t.
What will you need?
For the Box:
- Plywood or MDF or sheet metal.
- Non fluorescing UV resistant black paint for the inside of the box. I use Taubmans Tradex Black – expensive but perfect for the job.
- Acrylic for the front safety window which you must have if you have SW and/or MW. (See later)
For the UV lighting:
- Commercially made UV lamps can be used, but they are generally expensive. You have to design your box so that the lamps you purchase will fit. That’s why you need to make your lighting decisions first.
- You need to ensure the lighting you choose will be sufficient for the size of the box you want to build, and vice versa.
- If you are doing LW only, you have more flexibility because the individual LW LEDs are relatively small and can be attached anywhere on the “ceiling” of your box. (See later). If you are doing SW only or SW&LW, you need to plan carefully where you will put the SW lamp and the LW LEDs.
- If you are planning to have SW and are buying a ready-made commercially produced lamp the simplest way to mount it is usually to cut a rectangular hole in the top of the box slightly smaller than the lamp, which then sits outside over the hole on top of the box. It can be attached to the ceiling inside the box, but this is more difficult and requires a significant change in the box size.
- If you want to build your own lighting and integrate it into the box, you need to have some expertise in matters electrical, and seek advice to get things exactly right. If you are not sure, you need to get an electrician who is willing learn how to do UV lighting to do it for you. See the next two sections.
DIY Long Wave Lighting.
- UV hobbyists no longer use UV “Blacklight Blue” tubes because LW LEDs give a stronger better light, but the tubes still work. They may be hard to come by and you need to take their length into account.
- I’ve been using 365nm mounted CUN66A1G Ultraviolet SMD UV 3535 LEDs from kaidomain.com for years, but new and better ones are coming out now.
- The size of your box will determine how many LEDs you need. The more you use the brighter the rocks will fluoresce.
- Each LW LED must be mounted on a suitable heat sink, and should have an Orange Peel reflector and a ZWB2 filter. The LEDs can be individually driven (12v) or be driven in series by a suitable driver (240v) (eg Mean Well). They are attached to the box ceiling.
DIY Short & Mid Wave Lighting
- The following is written for SW but it also applies exactly to MW.
- SW LEDs are not yet developed enough to be used for a display box. Tube lamps are needed for SW and MW. I use Philips TUV series. They are made in different wattages from 5W to 95W. You may have to import them or pay exorbitant prices if you can find someone selling them in Australia.
- The size of the box you want will determine the wattage you need. In a large box I use four 95W tubes. 95W tubes (they’re 600+ mm long) won’t fit in a box less than about 70cm wide. Mid sized boxes can use 60W tubes (about 400+ mm long). And so on.
- The more watts you have the brighter your display will be.
- You need electronic ballasts, E11 sockets and a way to support the tubes.
- You need filter glass which is by far the most expensive part of a SW lamp. There are two types: Hoya U325C and ZWB3. Hoya is better and lasts longer but is much more expensive. Both need to bought from overseas. Hoya U326C filter for a twin 95W lamp costs around A$900 – A$1000 from Hoya in Japan.
- You need a fan or fans to keep the tubes cool, as they generate a lot of heat
- You need a reflector usually made from polished aluminium.
- You can use compact SW 255nm UVC compact fluorescent lamps instead of the tube lamps. However they are only available in small power – max about 26W and they require filters. Their ballast is built in. Their tubes are clear glass – don’t confuse with LW compacts whose tubes are black.
White Light and Switches
- You may wish to have white light as well as UV. Strip LEDs are fine for this.
- If you have two or more of SW, MW, LW, White you will need a switch for each one. You can have it set up so when powered up, white is on all the time except when someone switches UV on. To do this you need a relay to kill white when UV is switched on.
The Box
- By far the best way to show your rocks is to have them on steps. The size of the steps will depend on the size of your rocks. Bigger rocks need bigger steps. You can see some examples here and see my Glow Boxes.
- You must have a safety window if you have SW and/or MW in order to protect viewers. Glass is unsatisfactory. The best material for the window is 3mm acrylic plastic. Ordinary perspex blocks SW and MW, but not LW. LW is not considered dangerous but the other two are – they sunburn you and can make your eyes sore. The best to use is Plexiglass OP2 or OP3 or equivalent. This is museum grade acrylic and blocks all UV wavelengths. Expensive, though. Crystal clear vinyl like is used on boats or tent windows blocks SW and MW, but deteriorates fairly quickly.
- If you use plywood for the steps you will have room under them for ballasts, 12v power supplies, relays etc.
- Don’t use black cardboard, fabric or vinyl to place the rocks on. The UV will soon fade them to an unattractive grey. Use a good quality UV-resistant non-fluorescing black paint – it will last for ever.
Conclusion
If that all sounds too complicated you can set up a nice display with or without a box, and show it using torches – wide beam is best, like our FL9 and/or portable lamps like our FS26. No safety window would be needed.
Fluorescent Mineral collecting and displaying is a wonderful and inspiring hobby, but there is a lot to learn, and it may be quite expensive.